LogoLogo
WalletsEcosystemStart BuildingJoin the Community
  • Welcome to IoTeX 2.0
    • 💡Why IoTeX
    • 🪙Tokenomics
      • IOTX Utility in IoTeX 2.0
      • IOTX Emission, Deflation, and Re-Staking
    • 📖Whitepaper
    • ⚡Get Started
  • DePIN Infra Modules (DIM)
    • DIMs Overview
    • [IoTeX L1] DePIN Blockchain
      • Core Concepts
        • Consensus Mechanism
        • Voters and Delegates
        • Ethereum Virtual Machine
        • Accounts & Identities
        • Blockchain Actions
        • ERC20 and NFT Tokens
        • Smart Contracts
        • Interoperability
        • Governance
      • The IOTX Token
        • IOTX Token Exchange Support
        • Different Formats of the IOTX Token
        • IOTX Token Contracts
      • Wallets
        • Supported Wallet Apps
          • ioPay Mobile
          • IoTeX Web Wallet
          • OKX Wallet
          • Rabby Wallet
          • Metamask Desktop
          • Ledger Nano S & X
            • Use Ledger with Metamask
            • Use Ledger with Rabby Walet
            • Use Ledger with IoTeX Hub Portal
            • Migrate to the Ethereum Ledger App
          • IoTeX Desktop Wallet
          • 👩‍💻IoTeX HD Derivation Path
        • Buy IOTX Tokens
        • Execute Transactions
          • Transfer IOTX Tokens
          • Transfer ERC20 Tokens
          • Interact with Dapps
          • Explore transactions
        • Migrate Assets to a different wallet
      • Staking & Governance
        • About IoTeX Staking
        • IoTeX Staking Guide
          • Native staking
          • Staking as NFT
        • Join the Governance
          • Marshall DAO
          • Improvement Proposals
      • Exchange Integration
      • 👨‍💻Deploy Dapps on IoTeX
    • [ioID] DePIN Identities
      • Why ioID?
      • System Architecture
      • Technical Specification
      • API Overview
      • ioID Enabled Services
      • Integrating ioID
      • Example Use Cases
    • [W3bstream] DePIN Verification
      • Overview of W3bstream
      • Multi-Prover Architecture
      • 👨‍💻Build with W3bstream
        • Get Started
          • Sequencer Options
        • Build the Prover Code
          • Risc Zero
          • Halo2
          • zkWASM
        • Deploy to W3bstream
          • Create the Project File
          • W3bstream Outputs
          • Deploying Projects
          • Interacting with Projects
        • On-chain integration
          • Verify Risc0 Proofs
          • Verify Halo2 Proofs
          • Verify zkWASM profs
        • Sending Messages
      • 👩‍💻Node Operators
        • Configure a ZK Prover Node
        • Register your Node
    • [ioID-SDK] Hardware SDK
      • ioID-SDK Overview
      • Layered Architecture
      • Compatibility
      • Current Development Status
    • [MSP] Modular Security Pool
    • Third-Party DIMs
      • Data Sequencer Infras
      • Data Availability Infras
      • 👨‍💻W3bstream Tasks
  • Ecosystem
    • Assets on IoTeX
      • Mainstream Assets
      • IOTX and Derivatives
      • DePIN Tokens
      • MEME Coins
    • iotube Bridge
    • iotexscan Explorer
    • Ecosystem Apps
      • DePINScan
      • mimo DEX
      • ecosystem.iotex.io
    • "Powered by IoTeX" Devices
      • Pebble Tracker
        • Quick Start
        • Device Registration
        • Online Firmware Update
        • USB Firmware Update
        • Migrating to Pebble v2.0
          • 1.0 Device Registration
        • Tech Specs
        • Network Selection
        • Pebble Configuration
        • Query Pebble Data
        • Troubleshooting
        • Firmware Development
          • Hardware Setup
          • Build the Firmware
          • Flash the firmware
      • SenseCAP Indicator
      • UCam Home Camera
  • Builders
    • IoTeX Developer Portal
    • Dev Chat on Discord
    • Web3 Development
      • RPC Endpoints
      • Set up your Environment
      • Get Testnet IOTX Tokens
      • ioctl CLI
        • Installation
        • Create Accounts
        • Blockchain interaction
          • ioctl command reference
      • Chain Indexing
        • The Graph
        • SubQuery
        • IoTeX Analytics API
      • IoTeXscan API
      • Deterministic Deployment
      • Account Abstraction
        • Components of AA
        • 👩‍💻Creating new Accounts
        • 👨‍💻P256Account Example
      • Blob Transactions (EIP-4844)
      • Multicall3
      • EVM Precompiled Contracts
    • Building DePINs
      • ioID Step by Step Tutorial
        • Integrate ioID in the Device Firmware
        • Integrate ioID in your cloud
      • Decentralized WiFi Connectivity (DeWi)
        • Project Specification
        • The choice of Hardware
        • The Data API Service
        • DePIN Incentives Contract
    • Building DeFi
      • Deploy Tokens
        • Deploy an ERC20 Token
        • Deploy an NFT Token
      • Price Oracles
        • Chainlink Relayer
        • SupraOracles
      • Integrate IoTeX Staking
      • Liquid staking Dapps
    • Launch Dapps on IoTeX
      • Submit Tokens to the IoTeX Ecosystem
      • Submit tokens to the iotube bridge
      • Verify Smart Contracts
      • Audit your Contracts
      • Submit your Dapp to Portals
      • Useful tools
    • Node Operators
      • Fastblocks (Node as a Service)
      • Setup an IoTeX RPC Node
      • Run a Delegate Node
      • Rosetta API
    • Reference Docs
      • ioctl client
        • Accounts
        • HD Wallets
        • Aliases
        • Actions
        • Queries
        • Smart Contracts
        • Staking & Voting
        • Tokens
        • ioID Identities
        • W3bstream
        • Decentralized Identifiers (DID)
        • JWT Auth Tokens
      • Native IoTeX Development
        • IoTeX gRPC API
        • Account Cryptography
        • Address Conversion
        • Create Accounts
        • Estimate Gas Price
        • Make IOTX Transfers
        • Manage ERC20 Tokens
        • Smart Contract Interactions
        • ioPay Desktop
        • DID JWT Tokens
        • Calling any RPC method
      • Embedded Blockchain Clients
        • Arduino IDE
        • Linux Systems
        • PlatformIO
        • Examples
        • Tutorials
  • Participate
    • Crypto's Got Talent (CGT)
      • IoTeX x Polygon DePIN Grant
    • Governance
      • IoTeX Improvement Proposals
      • The Marshall DAO
    • Join the Community
    • Get in Touch
Powered by GitBook
LogoLogo

This documentation portal is currently undergoing updates to align with the IoTeX 2.0 Whitepaper release. Information provided here may be incomplete, or out-of-date. Please use this portal for preliminary reference only, and check out the official IoTeX 2.0 Whitepaper for updated information.

  • .

2025 | IoTeX

On this page
  • Download the latest firmware file
  • Install and run Pebble USB Tools
  • Flash the firmware

Was this helpful?

Export as PDF
  1. Ecosystem
  2. "Powered by IoTeX" Devices
  3. Pebble Tracker

USB Firmware Update

PreviousOnline Firmware UpdateNextMigrating to Pebble v2.0

Last updated 5 months ago

Was this helpful?

USB Firmware update method is ideal in the following situations:

  • You don’t yet have a SIM card installed in your Pebble Tracker.

  • The IoT cellular connection in your area is weak or unreliable.

  • You don't have data credit or prefer to save data usage on your IoT data plan.

You can easily upgrade the firmware of your Pebble Tracker offline by following these steps:

Download the latest firmware file

  • Visit the official GitHub repository for your Pebble Tracker firmware, link below.

  • Ensure you download the file with a .hex extension.

Install and run Pebble USB Tools

Note: If you see an error message from MacOS stating that it cannot run PebbleUSBTools because of security reasons, follow the steps below:

  • Open Settings → Privacy & Security

  • Scroll down to the Security section

  • Find the "PebbleUSBTools ws blocked to protect your Mac" message

  • Click the Open Anyway button and confirm the exception

  • Open the PebbleUSBTools app again.

  1. Enter the PebbleUSBTool folder

  2. Install pebble-udev_1.0.1-all.deb

  3. chmod +777 PebbleUSBTools

  4. Reboot your system

  5. Inside the PebbleUSBTool folder run ./PebbleUSBTools

Flash the firmware

  • Ensure Pebble USB Tool is running.

  • Connect Pebble to your computer: Use the micro-USB data cable provided with Pebble to connect the device to your computer using a USB port.

  • Press and keep pressing the Confirm/Power button then, while you keep pressing it, use a pin or a SIM card tool to press the hardware reset button (it's located in the tiny hole next to the SIM card holder).

  • Wait for the red led to light on then release the power button: Pebble is now in USB firmware update mode

Please note that will have about 20 seconds to perform the update step before the device will reboot if no action is taken.

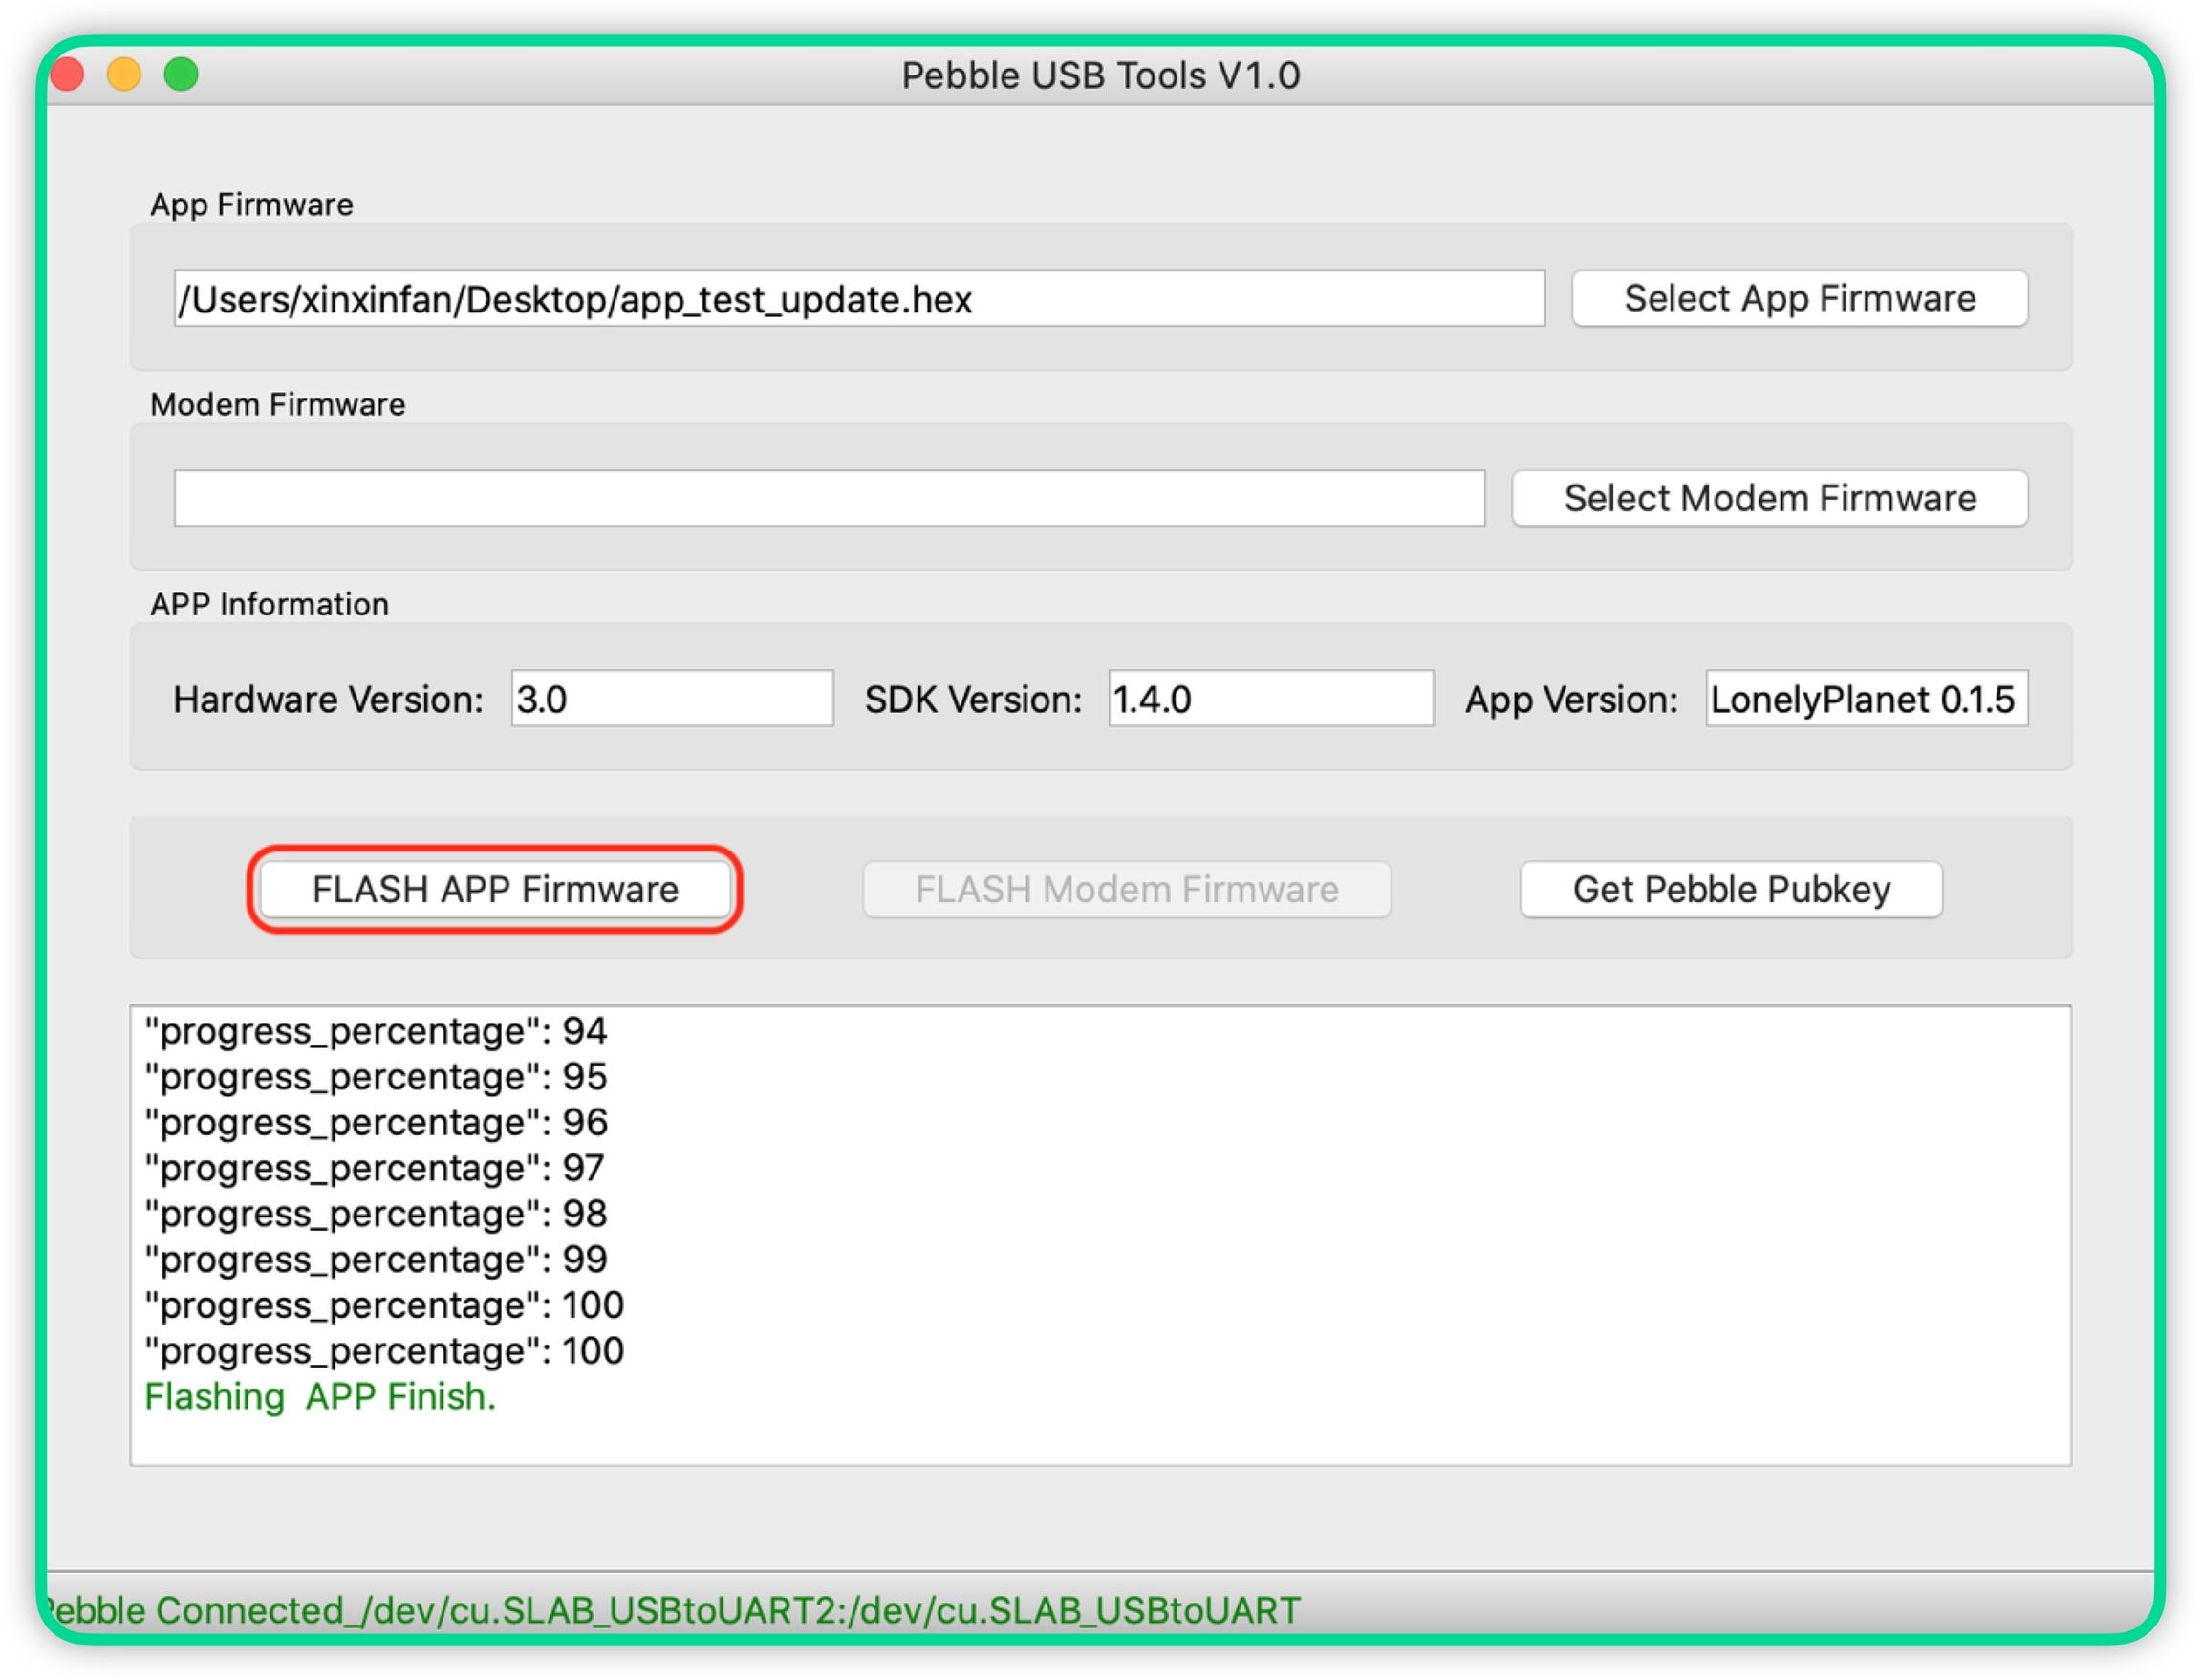
  • Wait for Pebble Connection In the Pebble USB Tool, watch for the status bar to confirm that your Pebble Tracker is connected. Once it indicates a successful connection, you can proceed with flashing the firmware:

  • Flash the Firmware: click the “Flash APP Firmware” button and follow the flashing progress in the log area:

The device will automatically reboot once the operation is complete, loading the new firmware successfully.

If you just upgraded from Pebble Software version 1.0.x to 2.0 please complete the migration by following the Device Registration guide.

Download and install the latest for macOS

Download, unzip, right→click and open the app file:

Download and install the latest

Unzip and run the executable file:

Download and unzip

VCP Drivers
PebbleUSBTool
VCP Driver for Windows
PebbleUSBTools.exe
PebbleUSBTools
Releases · iotexproject/pebble-appsGitHub
Logo