> For the complete documentation index, see [llms.txt](https://docs.iotex.io/llms.txt). Markdown versions of documentation pages are available by appending `.md` to page URLs; this page is available as [Markdown](https://docs.iotex.io/blockchain/build/depin/ioid-step-by-step-tutorial/a-fully-decentralized-approach.md).
# Integrate ioID in the Device Firmware
A fully decentralized approach
This tutorial demonstrates a fully decentralized approach to managing the lifecycle of device identity and ownership in DePINs using ioID. This method aligns perfectly with the principles of a true Web3 project, enabling device owners to independently initiate and complete the registration process without relying on centralized cloud services.
The document offers a practical, hands-on guide featuring an ESP32 board, with instructions that can be easily adapted to a variety of other “machines,” including Linux-based boards, smartphones, and desktop computers.
{% hint style="info" %}
[-> Source code on GitHub.](https://github.com/iotexproject/depin-tutorials/tree/main/esp32-device-registration)
{% endhint %}
## Integrate ioID SDK in your device
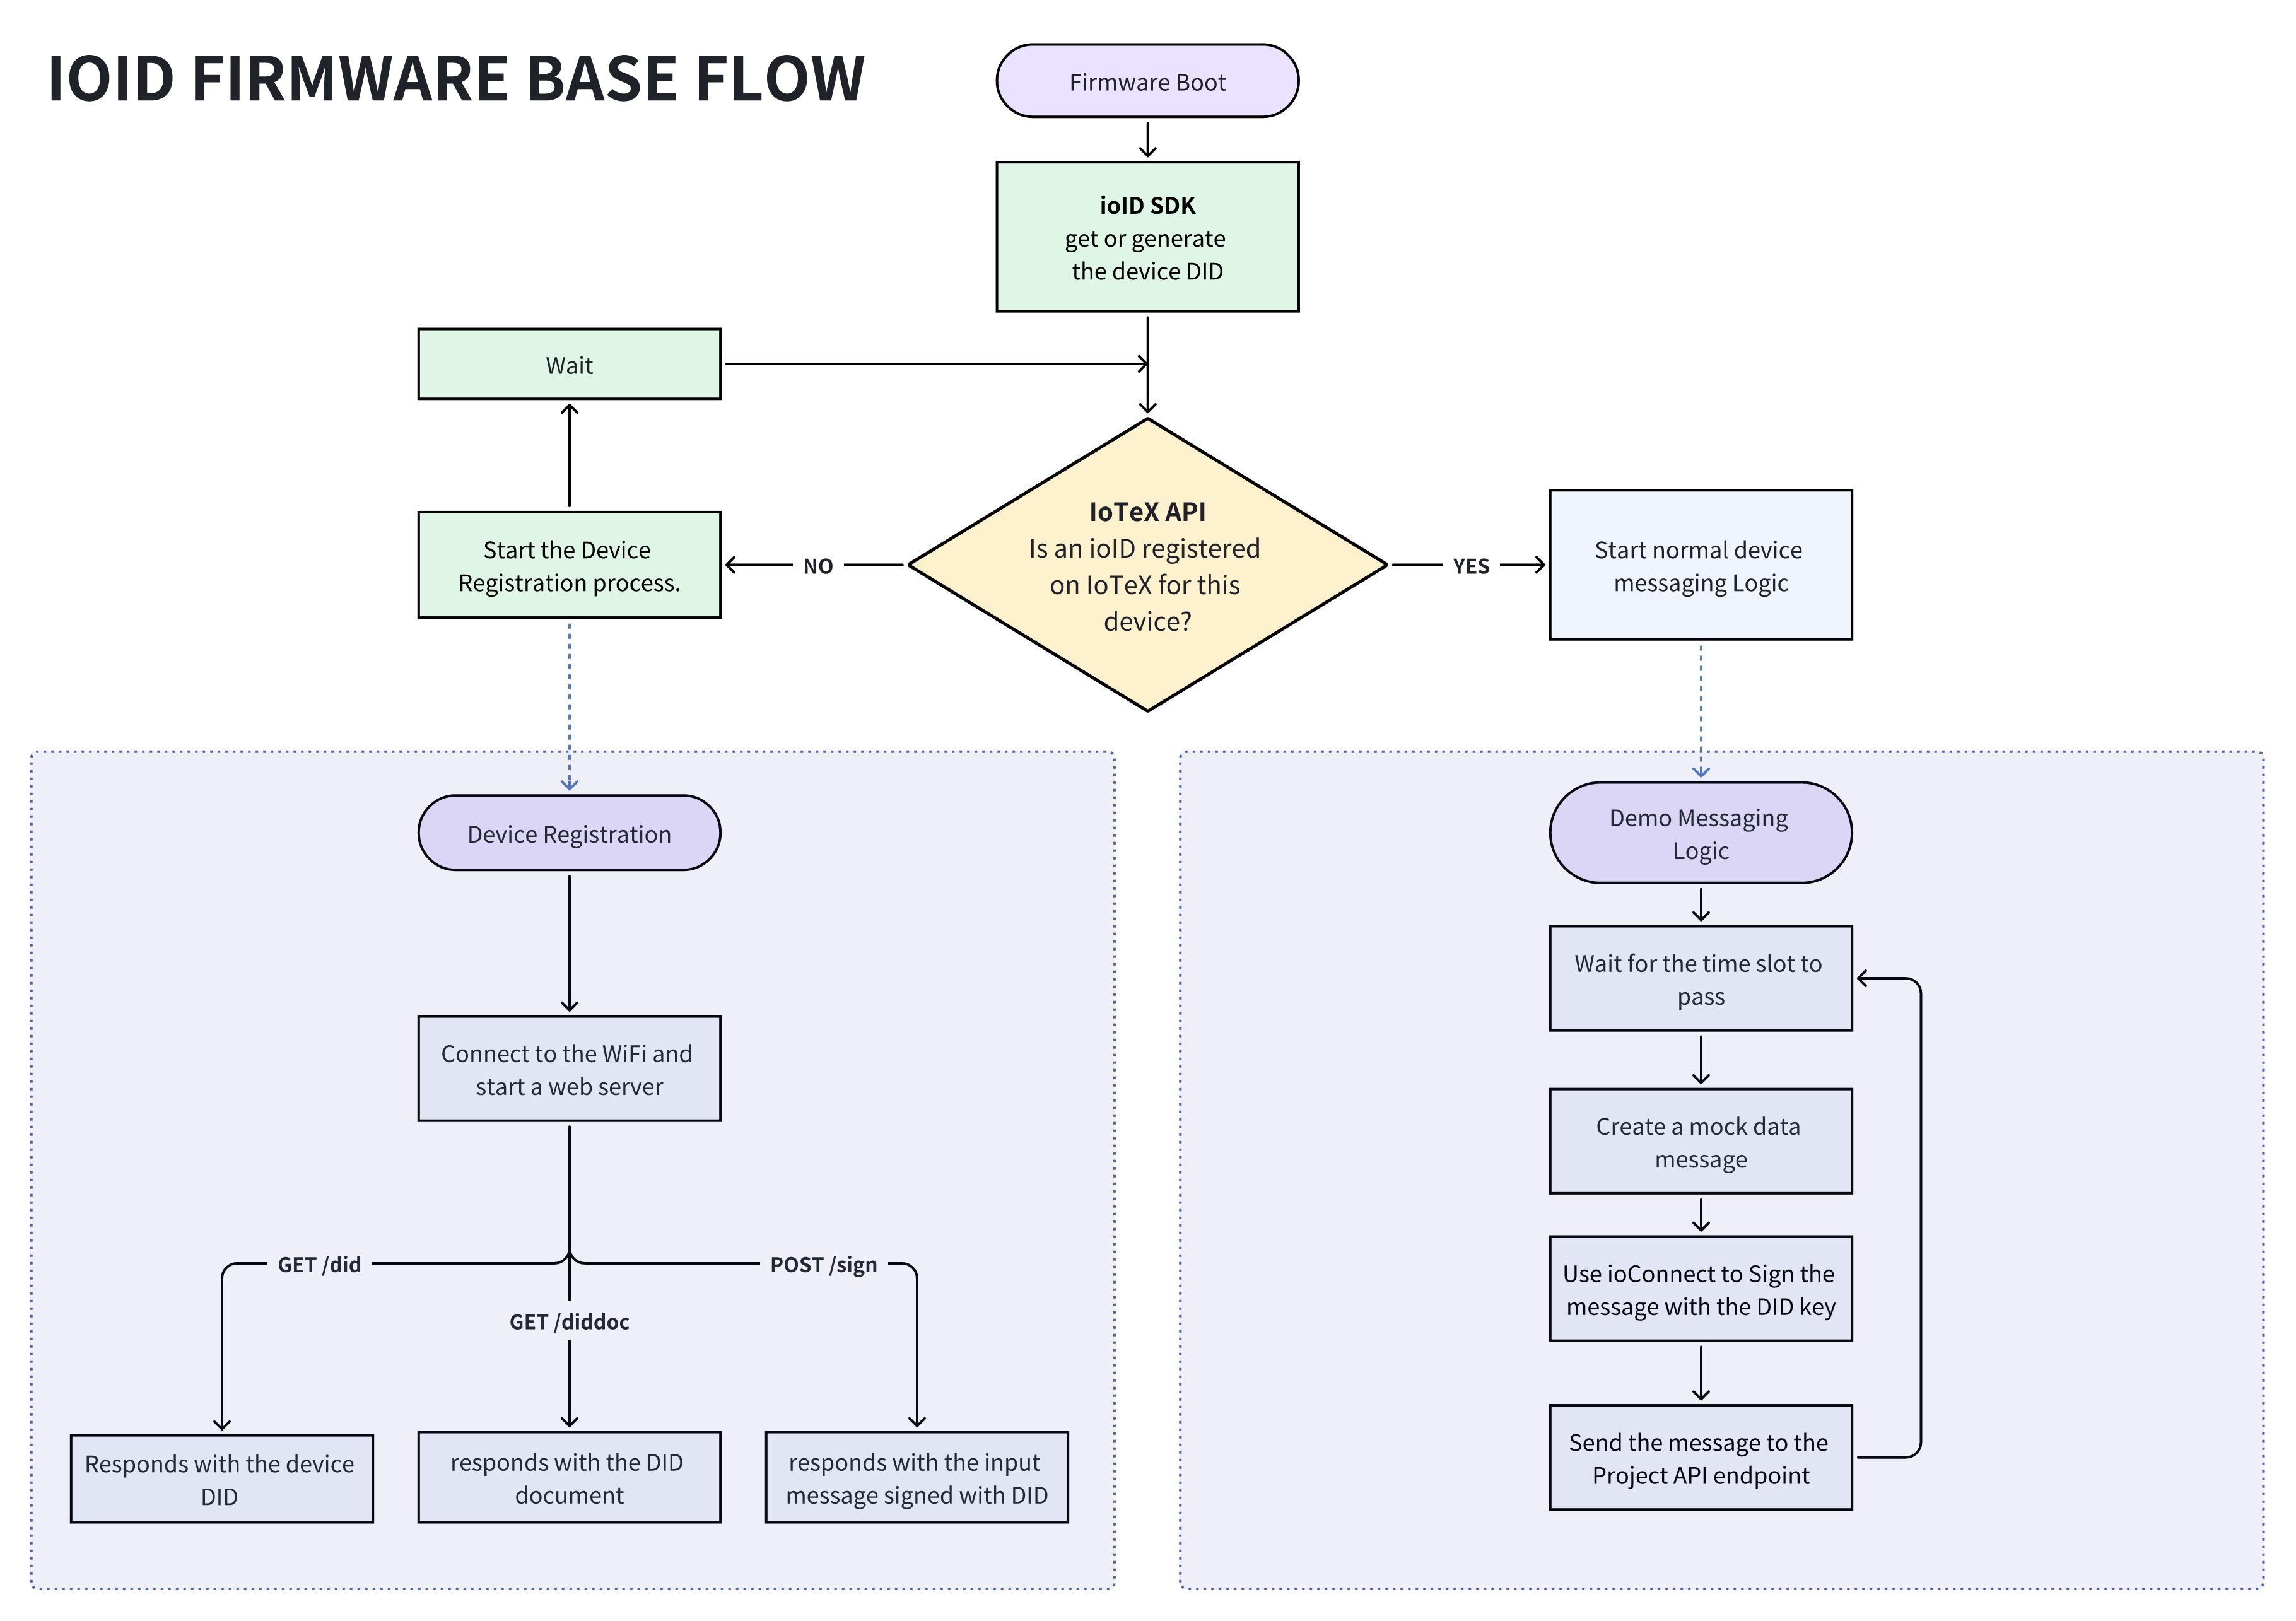
In this step, we will use the popular ESP32 board as our DePIN device and create a simple firmware that enables the device to be registered on-chain by the device owner. This demonstrates the integration of ioID-SDK with minimal setup, making it a practical and efficient way to securely connect your DePIN devices to your Dapp on the IoTeX blockchain.
{% hint style="info" %}
Below is a flowchart illustrating the basic flow common to most use cases. The process ensures proper device registration at boot and, during normal operation, the device utilizes its DID key to sign messages securely.
{% endhint %}
### Prerequisite
Before proceeding, ensure you have an [ESP32 toolchain correctly configured](https://docs.espressif.com/projects/esp-idf/en/stable/esp32/get-started/index.html) on your system. This is essential for building the code and deploying it to your ESP32 board. A [VS Code extension](https://github.com/espressif/vscode-esp-idf-extension/tree/master) is also available.
### Get the ioID-SDK example
Clone ioID-SDK and enter the ESP32 examples folder:
```bash
git clone https://github.com/iotexproject/ioID-SDK && cd ioID-SDK/example
```
Clone the tutorial:
```
git clone https://github.com/iotexproject/depin-tutorials && cd depin-tutorials
```
### Build the demo
```bash
# make sure your ESP-IDF is configured
. $HOME/esp/esp-idf/export.sh
# Set the target chip according to your board
idf.py set-target esp32
# Clean
idf.py fullclean
# Configure SSID & Password in [Example Configuration]
# Enable ESP HTTPS server in [Component Config]
idf.py menuconfig
# Build
idf.py build
# Connect your board and flash (replace the correct serial port)
idf.py -p /dev/tty.usbserial-110 flash monitor
```
### Testing the Firmware
In this demo, the firmware is designed to accept HTTPS connections from a client and respond to a request to sign an ioID registration message that the client will utilize to call the ioID registration contract (ref. [ioID Registry Contract](https://github.com/iotexproject/ioID-contracts/blob/25841427d2ed8506c577fa02858e75047a6ab840/contracts/ioIDRegistry.sol#L108)).
{% hint style="success" %}
In other scenarios, the device might communicate via Bluetooth or simply request the owner’s address to perform on-chain registration directly.
{% endhint %}
To test the device:
**1. Find the Device’s IP Address:**
Check the terminal output to find the IP address assigned to the device.
**2. Open a Browser:**
Use a Chrome-based browser and navigate to the following URL:
```
https://YOUR_DEVCE_IP:8000/did
```
Replace YOUR\_DEVICE\_IP with the actual IP address of the device.
**3. Handle Security Warning:**
Accept the browser’s security warning. (The demo firmware does not provide a valid HTTPS certificate; however, in a production environment, you should use a valid certificate.)
**4. Verify the Response:**
The firmware should return some DID (Decentralized Identifier) information in response to the request:
## Register the device on IoTeX
The device is now ready to be registered. While any DePIN project can provide their own client to perform the actual registration, here are some tools that work with the device communication protocol implemented in this demo:
1. **The IoTeX Hub Portal:**
{% hint style="warning" %}
Please notice that this section of the IoTeX Hub portal under development and cannot be used at this moment. Please check back later for updates.
{% endhint %}
2. **An example command line tool community-developed using NodeJS**:
## A closer look at the device code
{% embed url="" %}
```c
void app_main(void)
{
...
// Generate or retrieve the DID
did_generate();
const char *stored_did = did_get();
// Extract the device address from the DID
const char *device_address = stored_did + 7; // Skip "did:io:"
// Check if this device is already registered
bool registered = is_device_registered(device_address);
if (!registered) {
ESP_LOGI(TAG, "Device not registered. Starting registration process...");
did_register_start();
// Halt the program until the user reboots the device
while (1) { vTaskDelay(pdMS_TO_TICKS(1000)); }
} else {
// Normal device behavior here
ESP_LOGI(TAG, "Device already registered.");
// Perform some work
// Generate a data message
// Sign it with the ioID SDK
// Send the message to the DEPIN project's data endpoint
}
```
---
# Agent Instructions
This documentation is published with GitBook. GitBook is the documentation platform designed so that both humans and AI agents can read, navigate, and reason over technical content effectively. Learn more at gitbook.com.
## Querying This Documentation
If you need additional information that is not directly available in this page, you can query the documentation dynamically by asking a question.
Perform an HTTP GET request on the current page URL with the `ask` query parameter, and the optional `goal` query parameter:
```
GET https://docs.iotex.io/blockchain/build/depin/ioid-step-by-step-tutorial/a-fully-decentralized-approach.md?ask=&goal=
```
`ask` is the immediate question: it should be specific, self-contained, and written in natural language.
`goal` is optional and describes the broader end goal you are ultimately trying to accomplish on behalf of the user. GitBook uses it to tailor the answer towards what is most useful for that goal.
The response will contain a direct answer to the question and relevant excerpts and sources from the documentation.
Use this mechanism when the answer is not explicitly present in the current page, you need clarification or additional context, or you want to retrieve related documentation sections.